
AI Website Wizard
The AI Website Wizard is a powerful tool that helps you create complete, professional websites in minutes using artificial intelligence. By simply describing your business or project, the AI will automatically generate your website structure, content, pages, legal pages, and design sections - all customized to your needs.
Prerequisites
Before using the AI Website Wizard, ensure you have:
- AI Provider Configured: You must have an AI provider (OpenAI, Claude, or Perplexity) configured in Settings → AI Settings
- API Credits: Sufficient credits with your AI provider
- Website Categories: At least one website category created (recommended)
Important
If AI is not configured, you'll not able to see any AI button. So configure the AI settings frist from Settings => AI Settings
Accessing the AI Website Wizard
There are two ways to access the wizard:
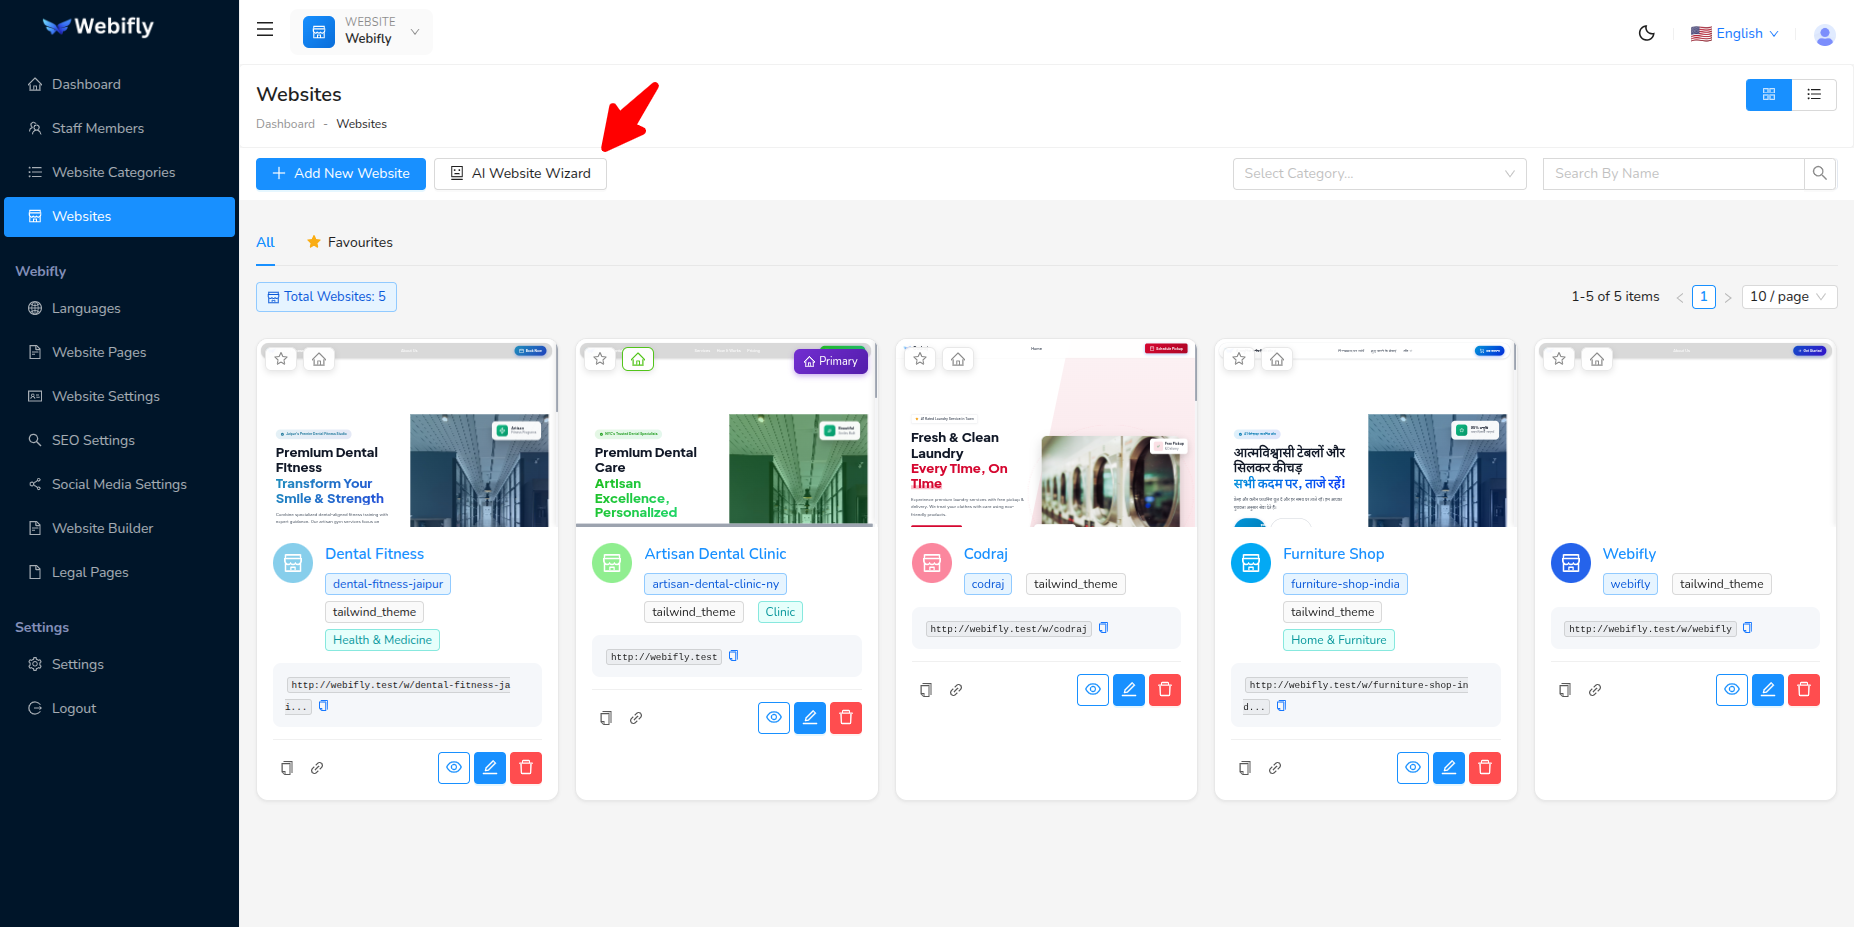
From Websites Page:
- Go to Websites from the sidebar menu
- Click the ** AI Website Wizard** button next to the "Add Website" button
The wizard opens in a modal window with a beautiful gradient header and progress tracking.
The Wizard Process
The AI Website Wizard follows a 4-phase process, each designed to build your website step by step:
Phase Overview
| Phase | Name | Description |
|---|---|---|
| Phase 1 | Website Creation | Extract and configure basic website information |
| Phase 2 | Page Generation | Generate custom pages for your website |
| Phase 3 | Legal Pages | Create legal pages (Privacy Policy, Terms, etc.) |
| Phase 4 | Section Generation | Generate content sections for your pages |
Each phase is displayed in the progress bar at the top of the wizard, showing you exactly where you are in the process.
Phase 1: Website Creation
This phase extracts basic information from your business description and creates your website foundation.
Step 1.1: Business Description
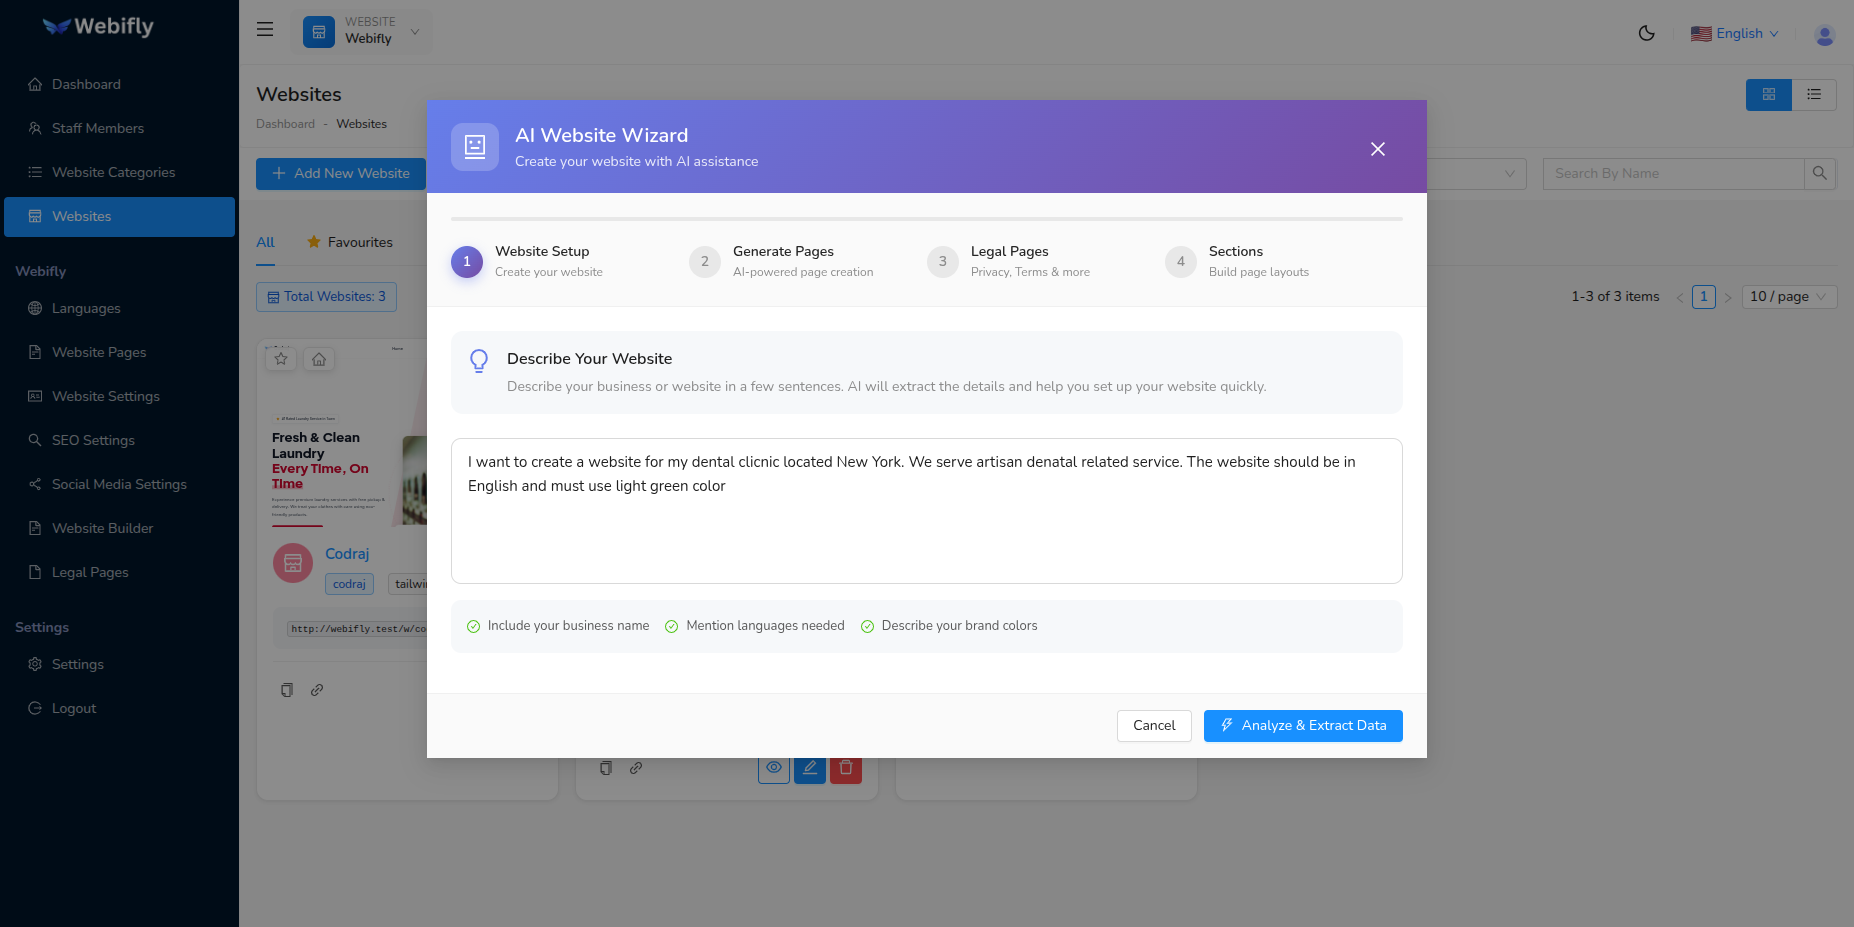
What to Enter:
Provide a detailed description of your business or website. Include:
- Business name and what you do
- Industry or category
- Languages you want to support
- Preferred colors
Example Description:
I want to create a website for my dental clinic located New York.
We serve all dental clinic related services.
The website should be in English and must use light green color.
Actions:
- Enter your business description in the text area
- Make it as detailed as possible for better AI results
- Click ⚡ Analyze and Extract button
The AI will analyze your description and extract structured information.
Step 1.2: Review Extracted Data
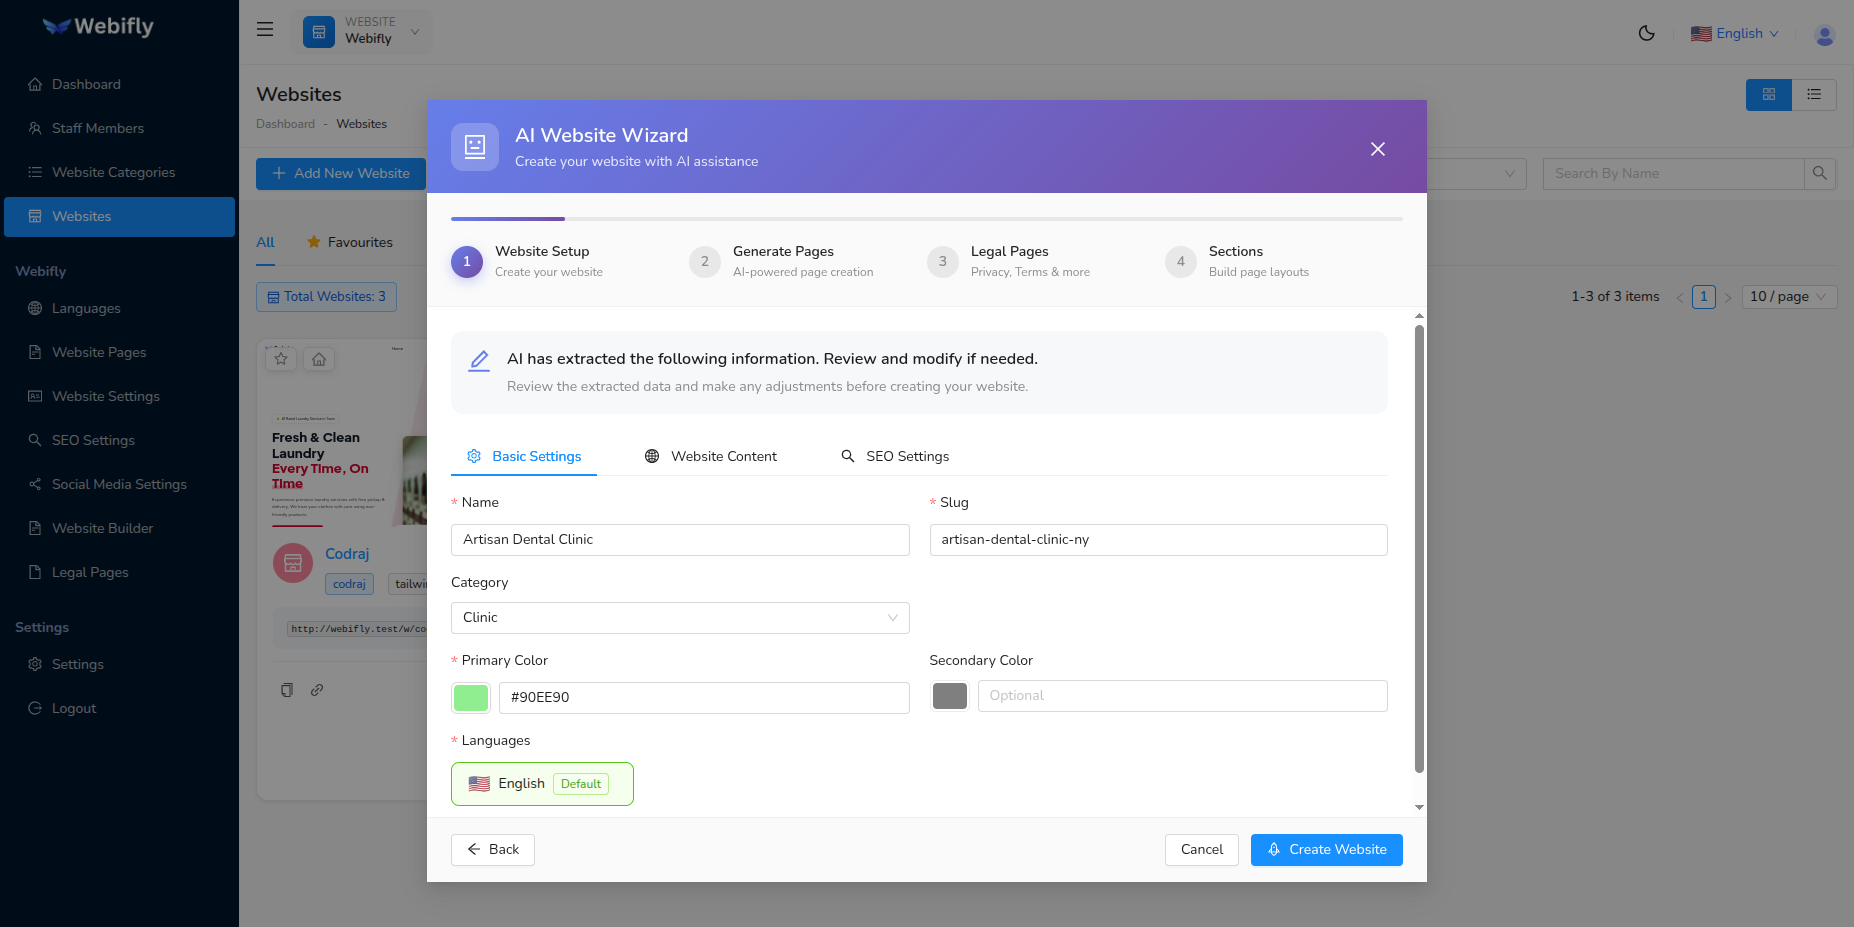
The AI extracts and presents the following information for your review:
Basic Information:
- Website Name: Extracted from your description
- Slug: Auto-generated URL-friendly identifier
- Category: Suggested category based on business type
Theme Settings:
- Primary Color: Suggested brand color
- Secondary Color: Accent color (optional)
- Theme Mode: Light or Dark mode
Languages:
- List of languages to support on your website
- Each language shows flag, name, and settings
- Default language is marked
- You can enable/disable languages
- RTL support for languages like Arabic
Website Settings:
- Business phone, email, address
- Business hours
- Tagline and description
Actions:
- Review all extracted information
- Edit any field if needed
- Add or remove languages
- Adjust colors using color pickers
- Click 🚀 Create Website button
The wizard will create your website with all the configured settings.
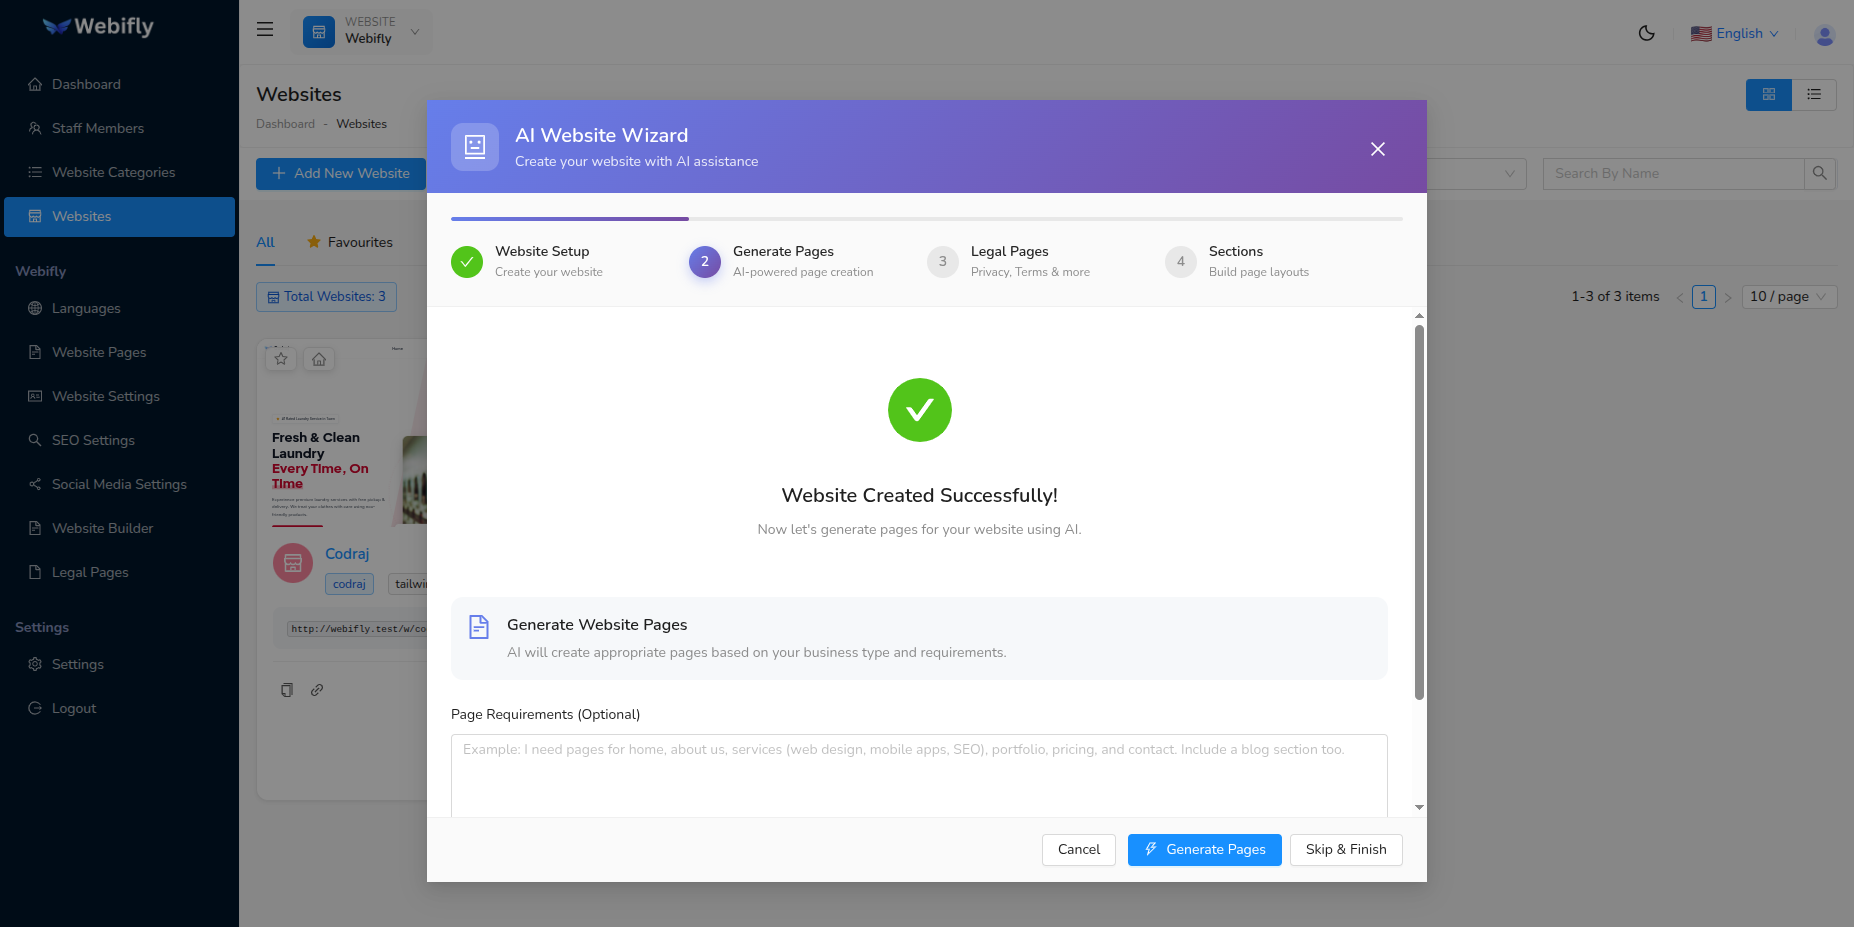
Once created, you'll automatically move to Phase 2.
Phase 2: Page Generation
This phase generates custom pages for your website based on your business type and description.
Step 2.1: Generate Pages

What Happens:
The AI analyzes your website category and business description to suggest relevant pages such as:
- Home
- About Us
- Services
- Portfolio/Gallery
- Contact
- Blog
- Team
- FAQ
- And more based on your business type
Actions:
- Review the page generation prompt
- Click ⚡ Generate Pages button to let AI suggest pages
- Or click Skip Page Generation to skip this phase
Step 2.2: Select and Customize Pages
The AI presents suggested pages with:
- Page Name: Suggested name for each language
- Page Key: URL identifier (e.g., "about-us")
- Show in Header: Toggle to display in navigation menu
- Checkbox: Select which pages to create
Actions:
- Check/uncheck pages you want to create
- Edit page names if needed
- Toggle "Show in Header" for navigation visibility
- Click → Save and Continue button
The wizard saves all selected pages to your website.

Success! Your website now has custom pages. The wizard automatically proceeds to Phase 3.
Phase 3: Legal Pages Generation
This phase creates important legal documents for your website to ensure compliance with regulations.
Step 3.1: Generate Legal Page Suggestions
What Happens:
The AI suggests legal pages relevant to your business type and location:
- Privacy Policy
- Terms of Service
- Cookie Policy
- Refund Policy
- Disclaimer
- GDPR Compliance
- And others based on your business category
Actions:
- Review the legal page generation overview
- Click ⚡ Generate Suggestions to get AI recommendations
- Or click Skip Legal Pages if you'll add them later
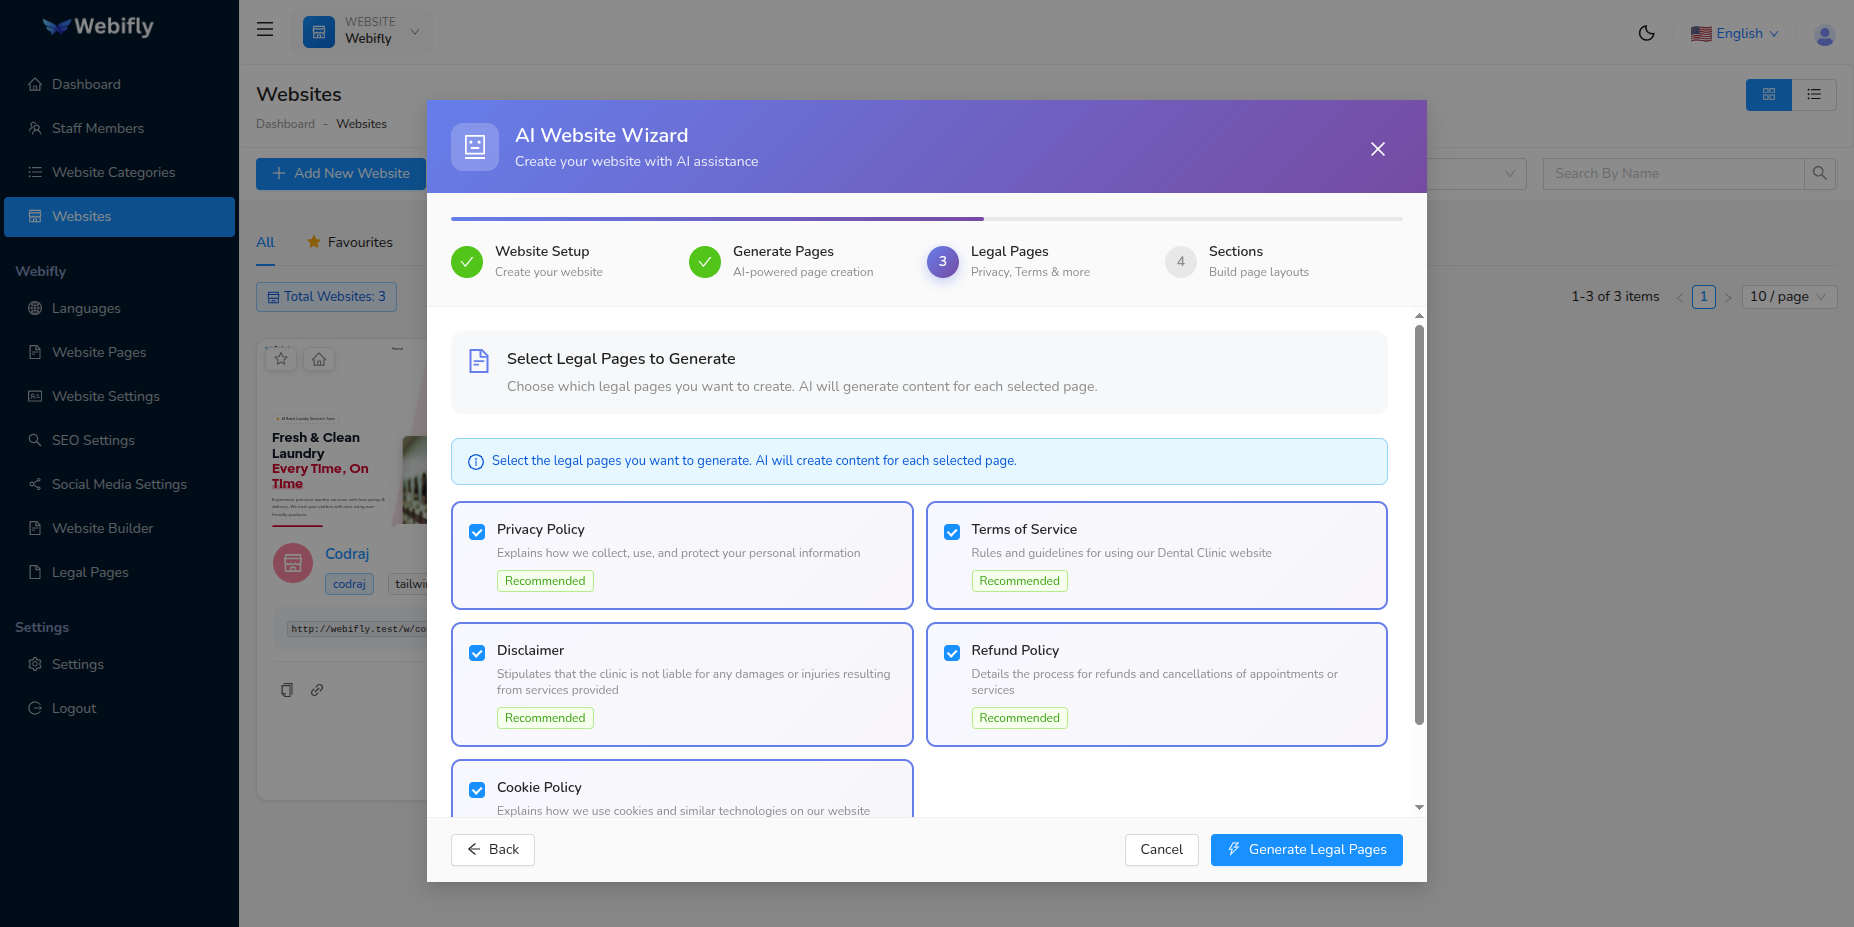
Step 3.2: Select Legal Pages
The AI presents suggested legal pages with:
- Page Title: Name of the legal document
- Description: What the document covers
- Checkbox: Select which pages to generate
- Recommendations: AI explains why each page is important for your business
Common Legal Pages:
- Privacy Policy: Required if you collect user data
- Terms of Service: Defines rules for using your website
- Cookie Policy: Required for EU visitors (GDPR)
- Refund Policy: Important for e-commerce sites
- Disclaimer: Limits your liability
Actions:
- Check the legal pages you want to create
- Review AI recommendations
- Click ⚡ Generate Legal Pages button
Step 3.3: Review Generated Content
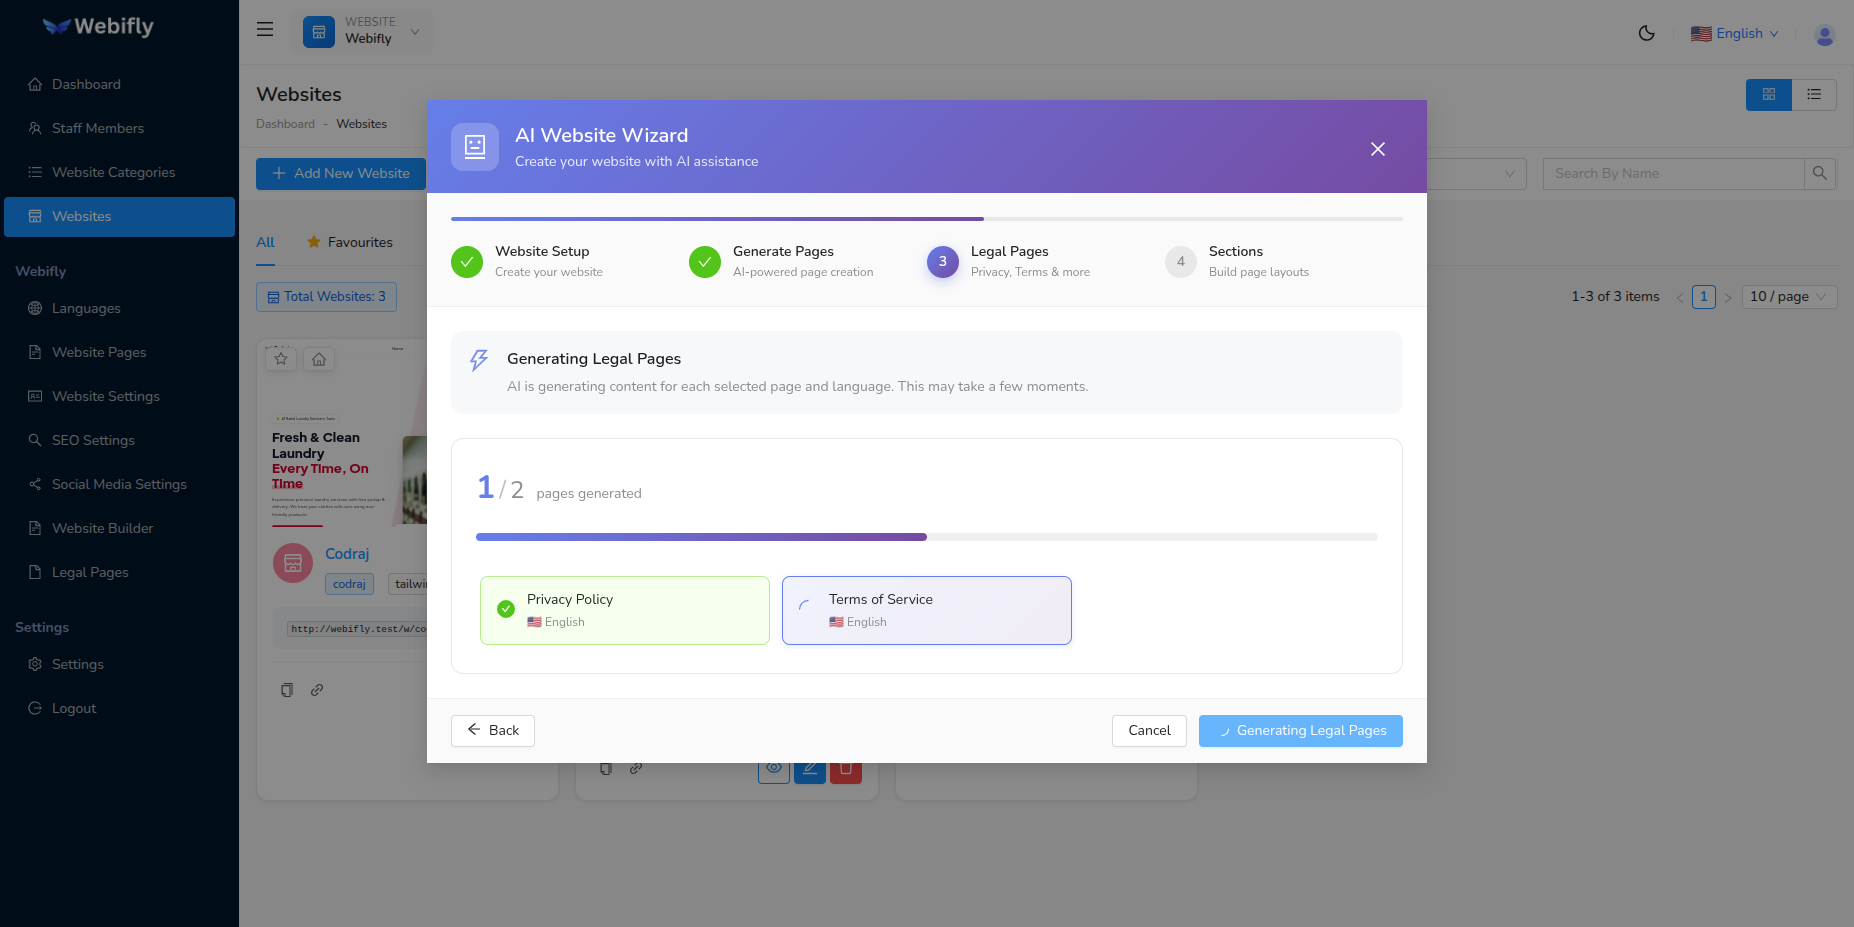
The AI generates complete legal document content customized for your business. You'll see progress as each page is generated:
- "Generating Privacy Policy..."
- "Generating Terms of Service..."
- And so on
What You'll See:
For each legal page:
- Full Content: Complete legal text tailored to your business
- Multi-Language: Content generated for all enabled languages
- Edit Option: Modify content before saving
- Preview: Expandable sections to review content
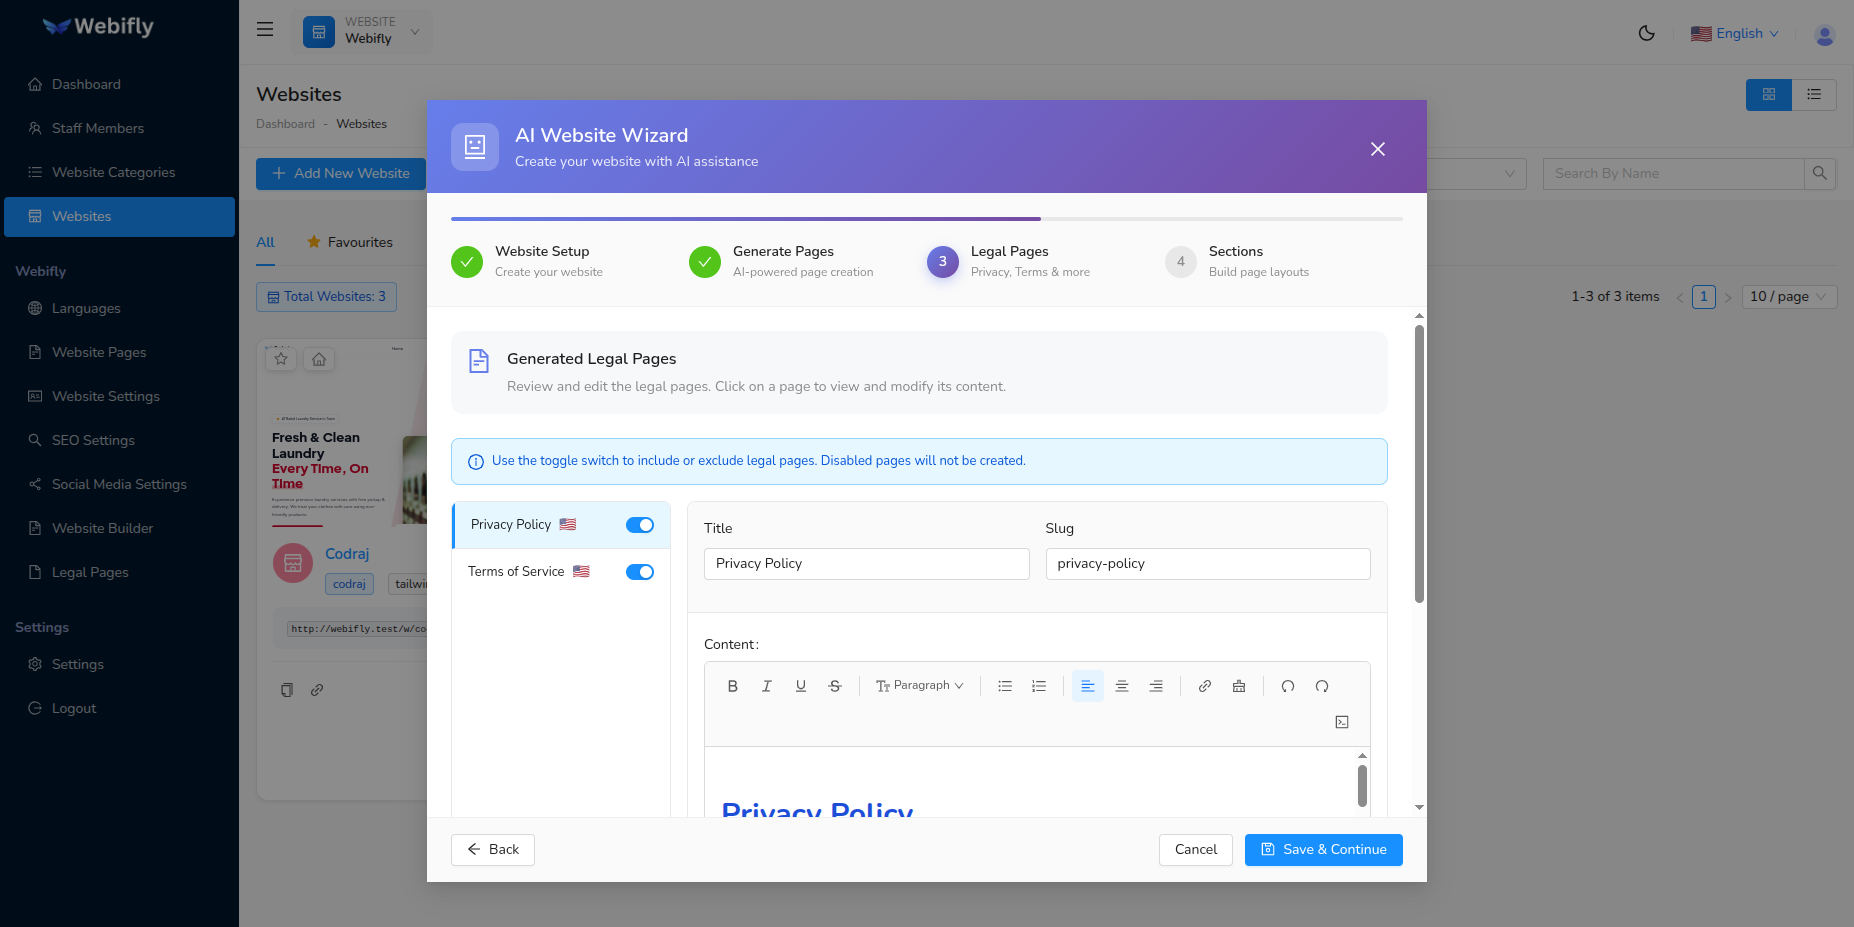
Actions:
- Review the generated legal documents
- Edit any content if needed
- Ensure all information is accurate for your business
- Click 💾 Save and Continue button
The wizard saves all legal pages to your website.
Success! Your website now has professional legal documents. Proceeding to the final phase.
Phase 4: Website Sections Generation
The final phase generates content sections for your website pages with text, images, and layouts.
Step 4.1: Generate Section Suggestions
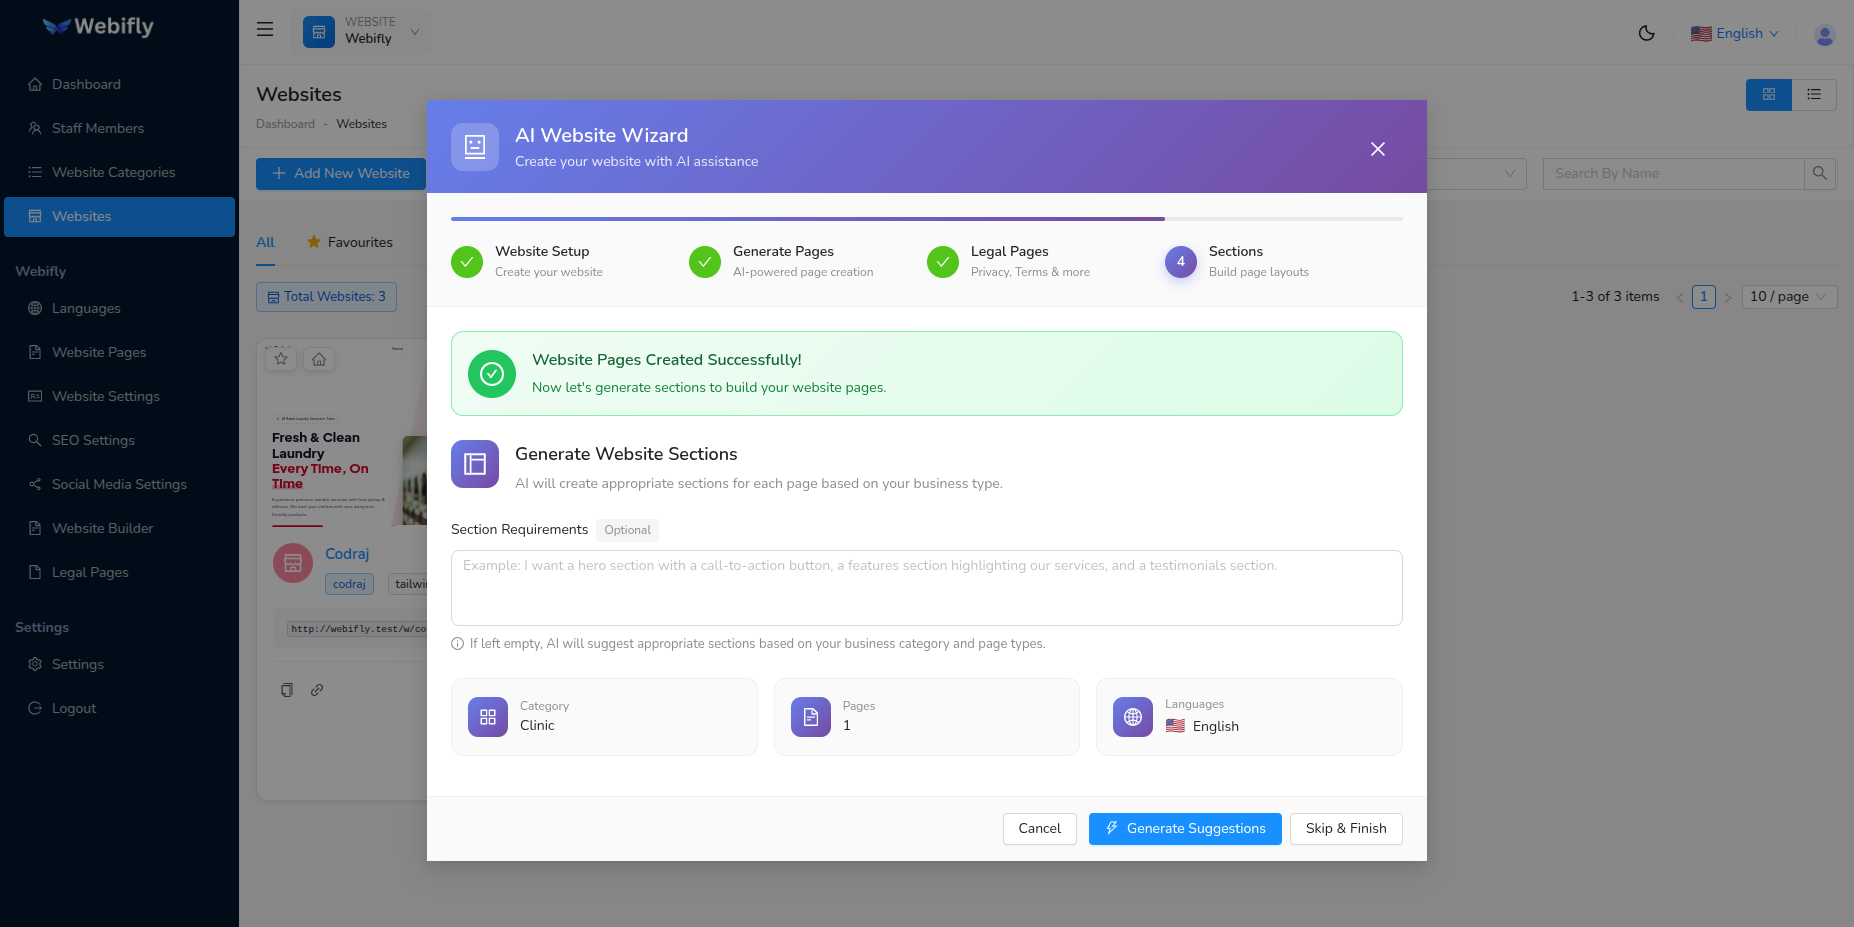
What Happens:
The AI analyzes your:
- Business description
- Website category
- Created pages
- Enabled languages
Then suggests appropriate sections like:
- Hero/Banner sections
- Features sections
- About sections
- Services sections
- Gallery sections
- Testimonials sections
- Contact sections
- Call-to-action sections
- Footer sections
Actions:
- Review the section generation prompt
- Click ⚡ Generate Suggestions to get AI recommendations
- Or click Skip and Finish to complete without sections
Step 4.2: Select Sections to Generate
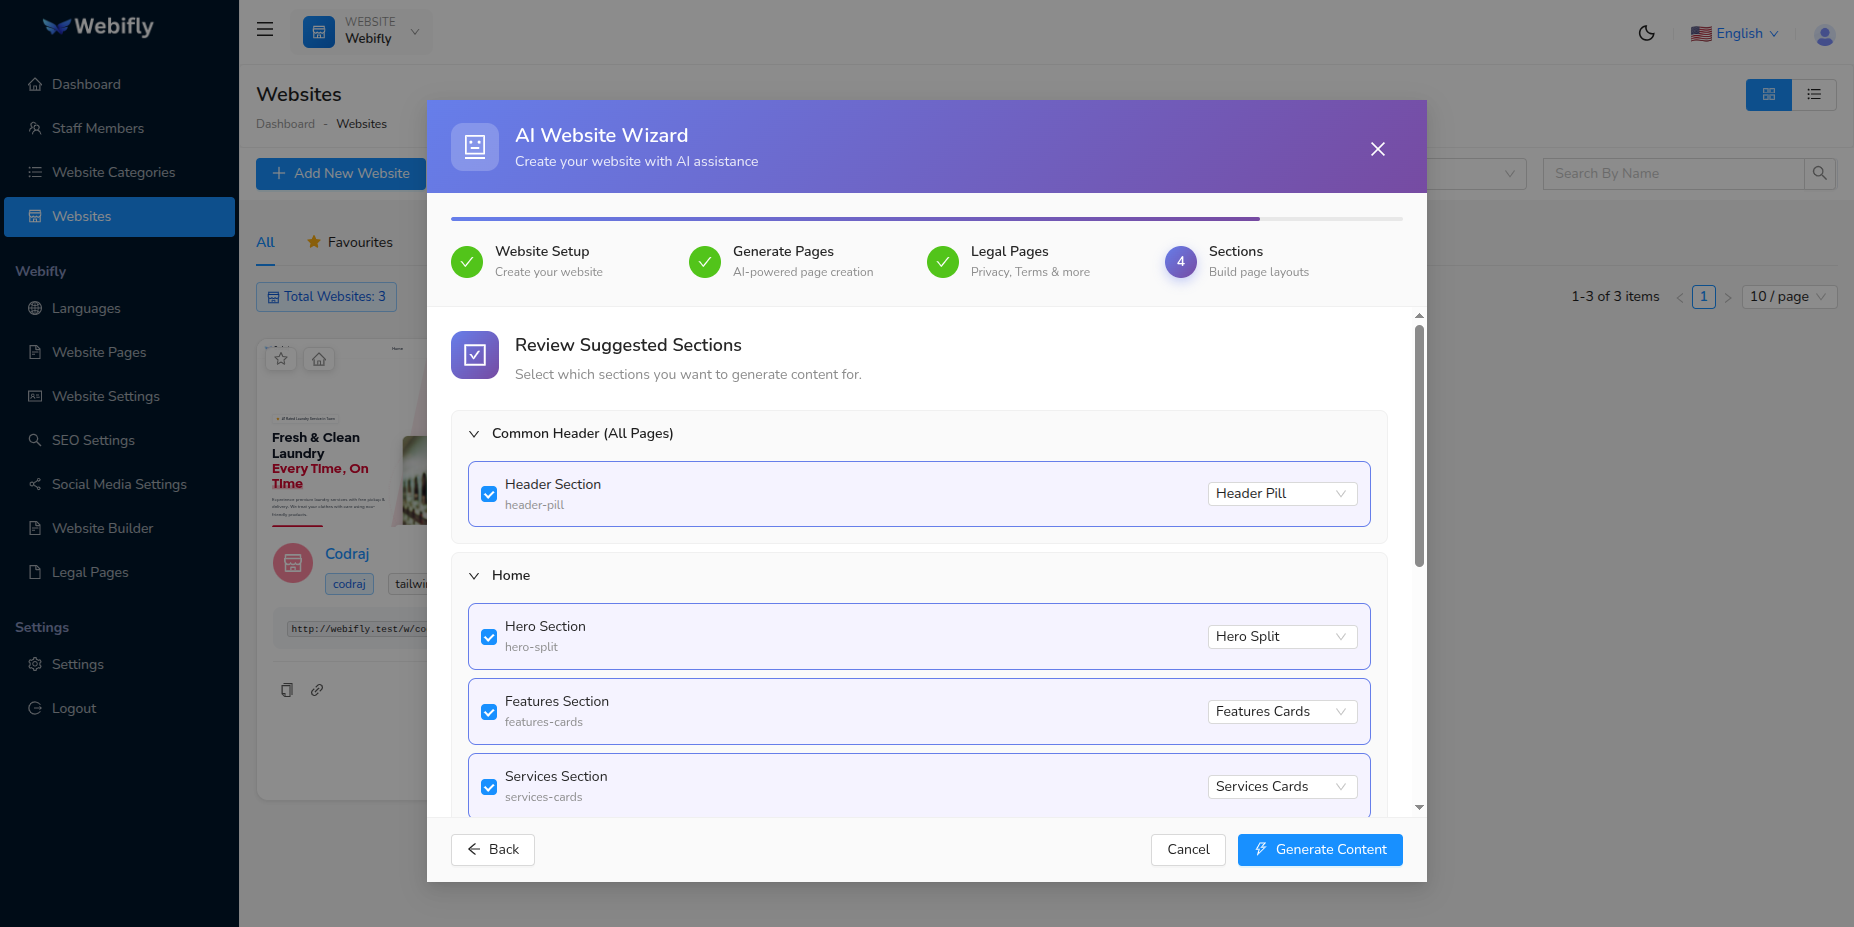
The AI presents suggested sections with:
- Section Type: Type of content section
- Section Name: Descriptive name
- Page Assignment: Which page it belongs to
- Layout: Visual layout style
- Description: What content will be included
- Checkbox: Select which sections to create
Section Details:
Each section shows:
- Target Page: Home, About, Services, etc.
- Position: Where it appears on the page
- Content Preview: Brief description of what will be generated
Actions:
- Check sections you want to create
- Review which pages they're assigned to
- Click ⚡ Generate Content button
Step 4.3: Review Generated Sections

The AI generates complete section content including:
- Headings and titles
- Body text and descriptions
- Call-to-action buttons
- Images and media placeholders
- Multi-language translations
Progress is shown as: "Generating Hero Section...", "Generating Features Section...", etc.
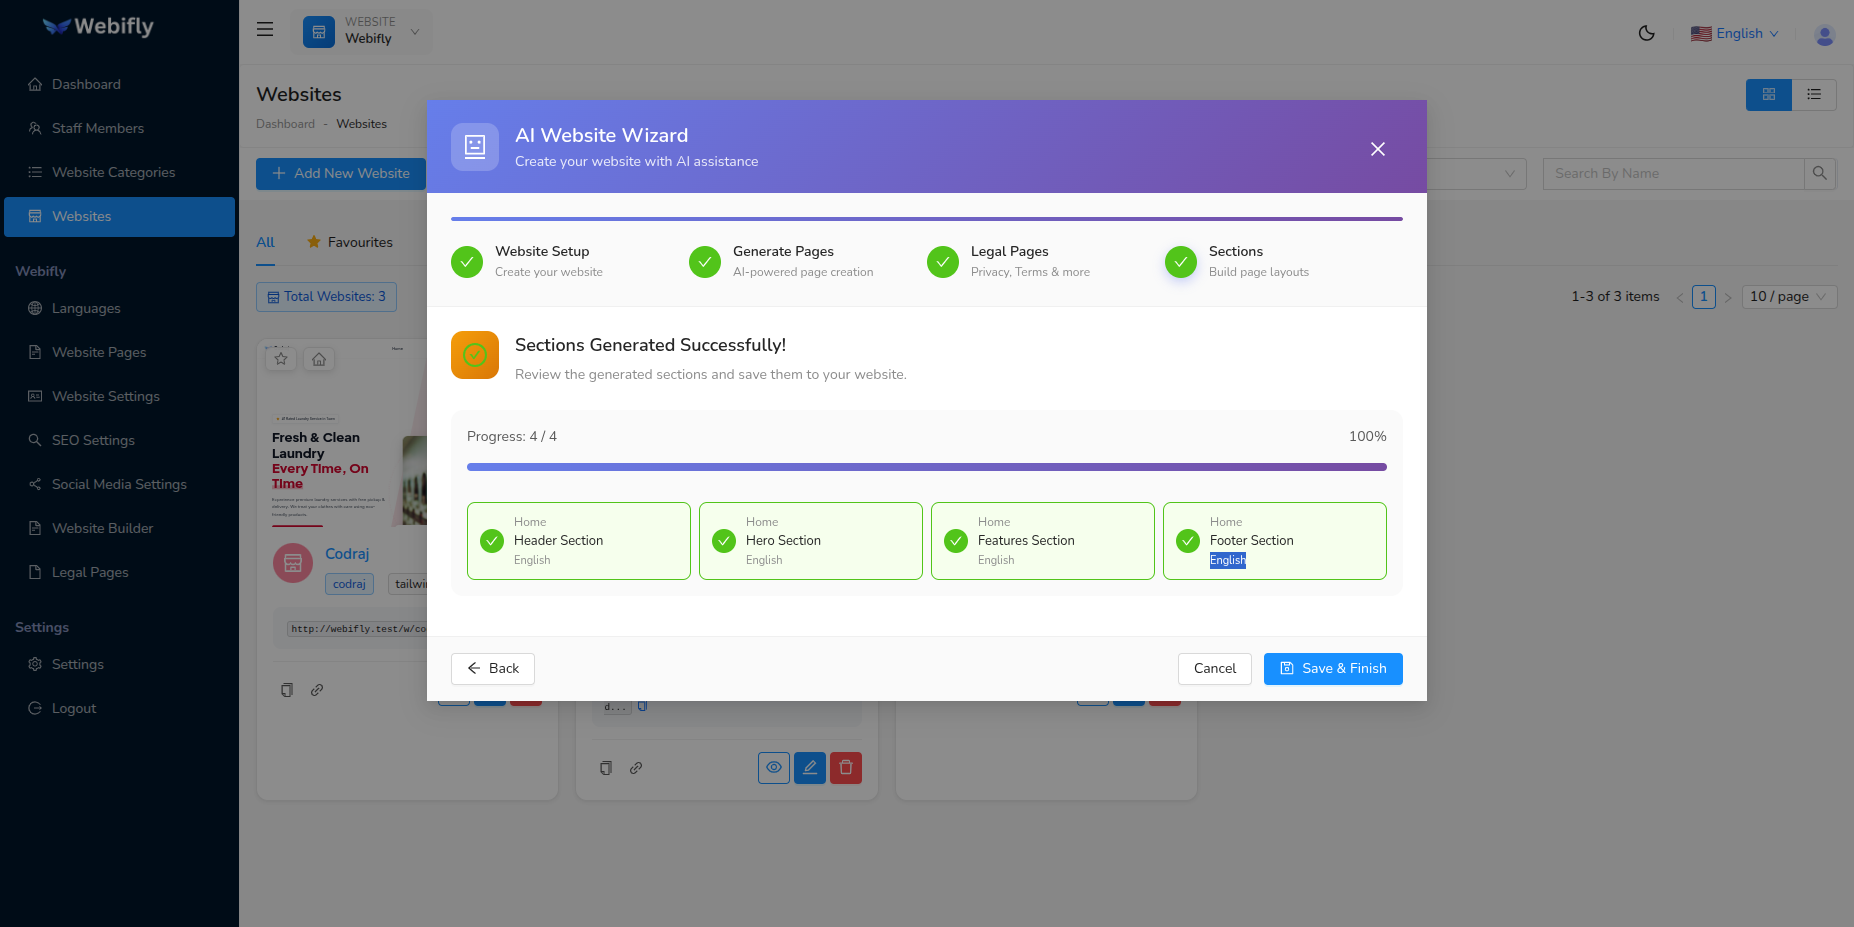
What You'll See:
For each section:
- Visual Preview: How the section looks
- Content Fields: All text content in each language
- Layout Options: Selected design layout
- Page Assignment: Which page it belongs to
- Edit Controls: Modify any content
Actions:
- Review all generated sections
- Edit titles, descriptions, or button text
- Verify translations in all languages
- Click 💾 Save and Finish button
The wizard saves all sections to your website pages.
🎉 Congratulations! Your AI-powered website is complete and ready to view!
Navigation During the Wizard
Progress Tracking
The wizard displays a visual progress bar showing:
- Current Phase: Highlighted in purple/blue gradient
- Completed Phases: Marked with green checkmark
- Upcoming Phases: Shown in gray
- Progress Percentage: Visual bar showing completion
Navigation Buttons
Footer Buttons:
- ← Back: Go back to previous step (when available)
- Cancel: Close wizard without saving remaining work
- ⚡ Action Buttons: Primary actions change per step
- Skip Options: Available for optional phases
Important Notes:
- You cannot go back once a phase is completed
- Back button is only available within the current step
- Closing the wizard mid-way will save any website already created
After Completion
Once the wizard finishes, your new website includes:
✅ Basic Website
- Configured with your branding
- Theme colors and styling
- Multi-language support
✅ Custom Pages
- Home, About, Services, etc.
- Customized for your business
- Available in all selected languages
✅ Legal Documents
- Privacy Policy
- Terms of Service
- Other compliance pages
- Tailored to your business type
✅ Content Sections
- Hero banners
- Features and services
- About and contact sections
- Professional layouts
Next Steps:
- View your website by clicking the preview link
- Further customize using the Website Builder
- Upload your actual business images
- Adjust content as needed
- Configure additional settings
- Publish your website!
Tips for Best Results
Writing Effective Descriptions
Be Specific: ✅ Good: "Elite Events - premium event planning specializing in corporate events and weddings in New York" ❌ Vague: "Event company"
Include Key Details:
- Business name
- Industry/category
- Location/service area
- Target audience
- Key services
- Unique selling points
Mention Preferences:
- Languages needed
- Preferred colors
- Website style (modern, classic, minimal)
- Important features
During Review Steps
- Check All Content: Review AI-generated content carefully
- Verify Contact Info: Ensure phone, email, address are correct
- Edit as Needed: AI is smart but may need adjustments
- Test URLs: Ensure slug and page keys are appropriate
- Language Accuracy: Check translations if you know the language
Common Issues
AI Not Configured Error:
- Go to Settings → AI Settings
- Configure OpenAI, Claude, or Perplexity
- Return to wizard and try again
Generation Takes Long Time:
- Normal for large descriptions
- AI providers may have rate limits
- Wait patiently or try with shorter description
Content Not Perfect:
- AI generates baseline content
- You can edit everything afterward
- Use Website Builder to refine sections
- Replace placeholder images with real ones
Skipping Phases
You can skip optional phases if needed:
Phase 2: Pages
- Click Skip Page Generation
- You can manually add pages later
Phase 3: Legal Pages
- Click Skip Legal Pages
- Add legal documents manually when ready
Phase 4: Sections
- Click Skip and Finish
- Build content sections manually in Website Builder
TIP
Even if you skip phases, your website is created and accessible. You can always add content later through the Website Builder and Page Management sections.
Editing After Creation
Once the wizard completes, you can edit everything:
Website Settings:
- Go to Website Settings to update logo, colors, contact info
Pages:
- Go to Website Pages to edit or add pages
Legal Pages:
- Go to Legal Pages to modify legal documents
Sections:
- Go to Website Builder to edit, add, or remove sections
Languages:
- Go to Website Languages to manage translations
Best Practices
AI Website Wizard Best Practices
- Prepare Your Description: Write a detailed business description before opening the wizard
- Have Assets Ready: Prepare your logo and brand colors in advance
- Know Your Needs: Decide which languages and pages you want beforehand
- Review Carefully: Check each step before clicking continue
- Edit Later: Don't worry about perfection - everything can be edited afterward
- Test Connection: Ensure AI settings are working before starting a big project
- Save Often: The wizard auto-saves progress, but be mindful of your internet connection
- Use Feedback: If AI generates something unexpected, revise your description and try again
Troubleshooting
Wizard Won't Open
Problem: Clicking the AI Wizard button shows nothing
Solutions:
- Check if AI is configured in Settings → AI Settings
- Verify you have an active API key with credits
- Refresh the page and try again
Extraction Fails
Problem: "Analyze and Extract" fails or returns empty data
Solutions:
- Make your description more detailed
- Include specific information (name, category, services)
- Check AI provider has sufficient credits
- Try a shorter description if very long
Pages Not Generating
Problem: Page generation takes too long or fails
Solutions:
- Check your internet connection
- Verify AI provider is responding (test in AI Settings)
- Try generating fewer pages at once
- Skip and add pages manually
Content in Wrong Language
Problem: Generated content is in unexpected language
Solutions:
- Specify languages clearly in your description
- Set default language correctly in website settings
- Edit the content manually after generation
Sections Not Displaying
Problem: Generated sections don't appear on pages
Solutions:
- Go to Website Builder and check if sections were saved
- Verify page assignments are correct
- Refresh your website preview
- Check if sections are hidden/inactive
Understanding the Technology
How It Works
The AI Website Wizard uses advanced language models to:
- Analyze: Reads your business description
- Extract: Identifies key information (name, category, colors, etc.)
- Generate: Creates content based on industry best practices
- Customize: Tailors everything to your specific business
- Translate: Produces content in multiple languages
AI Models Used
Depending on your configuration:
- OpenAI GPT: Best for creative content and detailed generation
- Claude: Excellent for long-form content and legal documents
- Perplexity: Great for research-based and factual content
Token Usage
Be aware that using the AI Wizard consumes API tokens:
- Phase 1: ~500-1000 tokens (extraction)
- Phase 2: ~1000-2000 tokens (page names and structure)
- Phase 3: ~3000-5000 tokens (legal content is lengthy)
- Phase 4: ~2000-4000 tokens per section
Total: Expect 10,000-20,000 tokens for a complete website generation
Monitor your usage in your AI provider's dashboard.
Frequently Asked Questions
Q: How long does it take to create a website with AI? A: Typically 5-10 minutes depending on the number of pages and sections you choose to generate.
Q: Can I use the wizard multiple times? A: Yes! Create as many websites as you need. Each wizard session creates a new, independent website.
Q: Do I need to complete all phases? A: No, you can skip optional phases (Pages, Legal Pages, Sections). Only Phase 1 (Website Creation) is required.
Q: Can I edit AI-generated content? A: Absolutely! All content can be edited at any time through the Website Builder and Settings pages.
Q: What if I don't like the generated content? A: You can re-run specific sections, edit manually, or use the wizard again with a better description.
Q: Is the AI wizard available in all plans? A: Check your Webifly AI plan details. AI features may require specific subscription levels.
Q: Does the wizard support all languages? A: Yes, the AI can generate content in most major languages. Specify your languages in the description for best results.
Q: Can I pause and resume the wizard? A: The wizard runs in one session, but if you close it after Phase 1, your website is saved and you can add content manually.